


")
Soil Moisture Sensor with Arduino
Original price was: ₹1,299.00.₹680.00Current price is: ₹680.00.
Components Needed for the Soil Moisture Sensor Project
To create a soil moisture sensor system with Arduino, you will need the following components:
- Arduino Uno board
- Soil moisture sensor
- Water pump (optional, if automating the watering system)
- Jumper wires
- Breadboard
- External power supply (if using a pump)
- Arduino IDE
Title: How to Build a Soil Moisture Sensor System

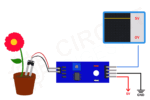
In today’s world of gardening and agriculture, ensuring that your plants are adequately watered is crucial for their growth. A simple yet effective way to automate this process is by using a soil moisture sensor. By integrating this sensor , you can create a system that monitors soil moisture levels and activates a watering system when needed. This guide will walk you through the process of building your own soil moisture sensor system, which is a great project for beginners and experienced users alike. It is also an excellent collage project idea, especially for those working on IoT projects or robotic projects.
What is Arduino?
Before diving into the project, let’s first explore. Arduino is an open-source electronics platform, which is based on easy-to-use hardware and software. Arduino boards, such as the Uno, are designed to read inputs from sensors and turn them into outputs like controlling motors or lights. For this particular project, we’ll be using the due to its simplicity and versatility.
Buy Now – Click Here
Components Needed for the Soil Moisture Sensor Project
To create a soil moisture sensor system with Arduino, you will need the following components:
- Arduino Uno board
- Soil moisture sensor
- Water pump (optional, if automating the watering system)
- Jumper wires
- Breadboard
- External power supply (if using a pump)
- Arduino IDE (you can download Arduino IDE from the official website Click Here)
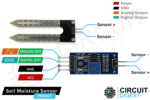
Understanding the Soil Moisture Sensor
The soil moisture sensor is a device used to detect the moisture level in the soil. It works by measuring the electrical resistance between two probes that are inserted into the soil. When the soil is dry, the resistance is high, and when the soil is moist, the resistance decreases. This sensor provides an analog output, which the Board reads to determine whether watering is needed.
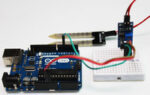
Wiring the Components
Now, let’s go through the wiring process for this Arduino project.
-
Soil Moisture Sensor:
- VCC to the 5V pin of the Board
- GND to the GND pin of the Board
- A0 (analog output) to A0 pin on the Board
-
Relay Module:
- VCC to the 5V pin on the Board
- GND to the GND pin on the Board
- IN to a digital pin (e.g., Pin 8)
-
Water Pump (optional):
- Connect the pump to the relay’s COM and NO pins. Ensure the pump is powered by an external power supply to avoid drawing too much current from the Arduino.
-
Arduino Uno will read the moisture level through the sensor and control the relay to turn the water pump on when needed.
Writing the Code for the Soil Moisture System
The next step is to write the code that will allow the Arduino Uno to control the watering system based on soil moisture levels. Below is a simple code to make it work:
This code reads the moisture level from the sensor and checks if it’s below a threshold. If the soil is too dry, the relay activates the water pump (if connected), watering the plants. The process repeats every second.
Uploading the Code
Once the code is written, you can upload it to the Arduino Uno using the Arduino IDE. Simply connect the board to your computer, select the correct board and port in the IDE, and click the “Upload” button. After the code is uploaded, your system will start monitoring the moisture level in the soil and watering your plants accordingly.
Applications of the Soil Moisture Sensor System
This IoT project can be expanded in various ways. For example, you could:
- Add a water level sensor to prevent the system from over-watering.
- Integrate Wi-Fi or Bluetooth modules to make it controllable remotely from your smartphone.
- Use Arduino Mega for controlling multiple sensors if you plan to automate watering for several plants.
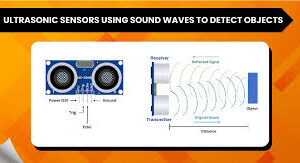
- Add a ultrasonic sensor Arduino to detect the water level in a tank for an automated irrigation system.
This project serves as an excellent introduction to Arduino programming and sensor integration, making it ideal for beginners. You could also use it as part of a collage project or for collage ideas for school project to demonstrate how technology can improve daily tasks.
Why You Should Try This Project
Building a soil moisture sensor system with Arduino Uno not only gives you hands-on experience with Arduino hardware but also helps you develop practical skills for automating real-world problems. The project is perfect for anyone interested in IoT projects or those looking for collage project ideas that showcase technology in action.
Furthermore, integrating this system with other technologies like robotic projects or photo collage ideas for school project can elevate your project’s scope and creativity. Arduino projects like these make learning both fun and rewarding because they combine the power of sensors, programming, and automation.
Conclusion
To sum up, building a soil moisture sensor system with Arduino is a fantastic way to introduce yourself to the world of automation and IoT projects. With minimal components and simple coding, you can create an effective watering system for plants that saves time and resources. Whether you are working on a collage project, developing a robotic project, or just experimenting with Arduino software, this project is a great starting point.


Reviews
There are no reviews yet.